Everything you need to know about Apple Mac and screenshots
Learning how to screenshot on Mac is as easy as flexing your fingers to be able to press 3 keys at the same time. There’s no need to download and install any third-party apps or resort to pop open your smartphone’s camera, instead. Just 3 buttons on your keyboard are all it takes to enable you to take a full or partial screenshot of your desktop. Or, perhaps even a full video!

Screenshot Fullscreen
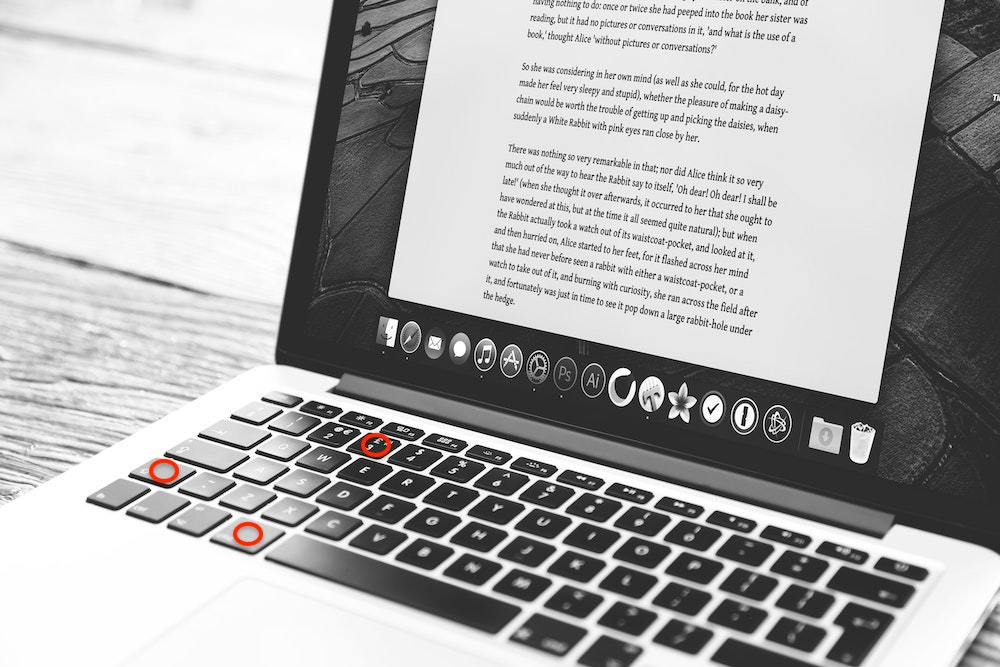
Pressing [Command + Shift + 3] at the same time will let you capture and highlight everything on your desktop (in other words, fullscreen), no matter how gargantuan your display may be. Or, how uncluttered your desktop is while you’re there.
Screenshot Partial Screen
If you’d prefer to capture only a portion of what’s on your screen instead of the whole display, then press [Command + Shift + 4] all at once. This brings up a re-sizeable window, which you can readily adjust how much of your desktop you’re willing to expose.
Screenshot Video
But, what if you want to share what you’re doing in real-time? If that’s the case, you can press [Command + Shift + 5] to start a video capture of your desktop. You could record a clip and then save or edit it as you wish. Pressing these also brings up the screenshot menu for more options.
The History Behind Desktop Screenshots
Fun fact: did you know that being able to screengrab the contents of your desktop is much older than most would assume? It predates trying to learn how to screenshot on Mac by a very, very long mile. A lot of you might imagine that native screenshots only came around in the days of the GUI, back in the early 80s. This was, after all, right when graphical interfaces made your desktop prettier to look at.
Actually, the first instances of screen grabbing or screen capturing were noted in the 1960s. It was at this time that the early iterations of interactive computing were experimented with. Granted, from then and onto the 80s, built-in screenshots were quite… Basic. Taking a “screenshot” would only copy all of the visible text on the screen, and then dump it all onto a text file. That’s something, I guess.
But, you’d be left clueless as to what it is that you were looking at. It wasn’t much of an issue then, as most computers barely had a graphical user interface to speak of. But with Windows and Mac rapidly becoming mainstream, and even with the barebones nature of DOS, you’d probably want something more akin to an image, rather than a log. Thus, why we take time to learn how to screenshot on Mac.
As computers became more ubiquitous among households, seemingly ordinary tools that we take for granted today, such as screenshotting your desktop, were a big deal. Simply pressing a random series of keys to capture everything (or just some things) on your screen made headlines not too long ago. With all that in mind, how can you take screenshots on Mac, in particular, and is it really that easy?
Native Options For How To Screenshot On Mac
As we explained earlier, there are 3 ways in which you can screenshot on Mac natively. These pick of the bunch are:
- Command + Shift + 3 – A fullscreen capture of everything visible on your desktop at a time.
- Command + Shift + 4 – Highlights a portion of the screen, where you can resize how much of the desktop you’d want to show.
- Command + Shift + 5 – Brings up the screenshot menu, where you can access more options. Or, it opens up the native screen recording feature, where you can record a video clip, instead.

However, there’s another option that we haven’t yet noted previously. Although, its usefulness is only applicable to some folks, especially if they own a Mac notebook of the past few years:
- Command + Shift + 6 – Screenshots of what you’re seeing and working with on the Touch Bar, although it’s only available for those who have one fitted on their device.
Another alternative is by using third-party apps that can broaden your workflow even more, with added features that native apps can’t otherwise have.
So, here are in-depth guides of how to screenshot on Mac, from the simplest of key presses to some of the more advanced techniques to highlight and capture what’s on your screen…
Command + Shift + 3 – How To Take A Fullscreen Screenshot On Mac
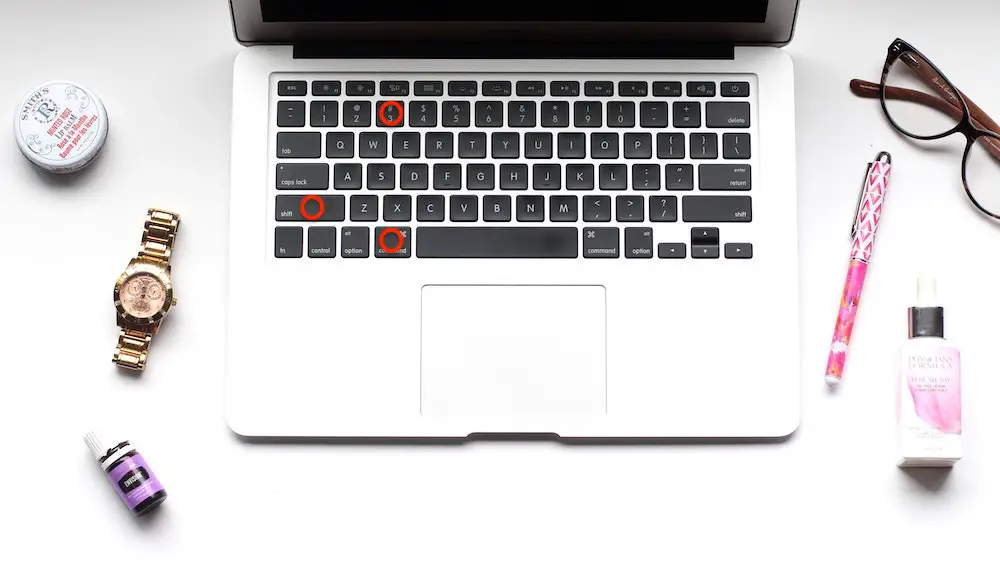
If you want to grab all of what you see on your screen at a time, you can press [Command + Shift + 3] to take a fullscreen screenshot of your Mac’s desktop interface. This encompasses the entire screen, also including the Dock at the bottom, and the Menu Bar up top.
Note, it’ll only capture one window – the one visible to you as you’re taking the screenshot – at a time. In other words, taking a screenshot while you’re at the desktop won’t automatically create and save another fullscreen screenshot of your app menu, for example.
With that being said, a Mac should be able to capture multiple displays at once when you activate a fullscreen screenshot. Let’s say you’ve hooked up your Mac to several monitors at once. In this case, it’ll take a fullscreen screen grab of the visible window on every monitor, and save it.
Fullscreen Screenshot On Mac – How To Save It
To take a fullscreen screenshot on your Mac, it’s as simple as holding down COMMAND and SHIFT at the same time, and then pressing 3 on the number row. In doing so, a small floating thumbnail window will appear on the bottom right corner of your desktop, previewing what you’ve just captured.
Once that thumbnail preview disappears, a fullscreen screenshot should be saved as an image file on the desktop. You could spot this image file quite easily by the filename, which appears following this format: “Screen Shot [date of the screenshot taken] at [time of the screenshot taken].png“
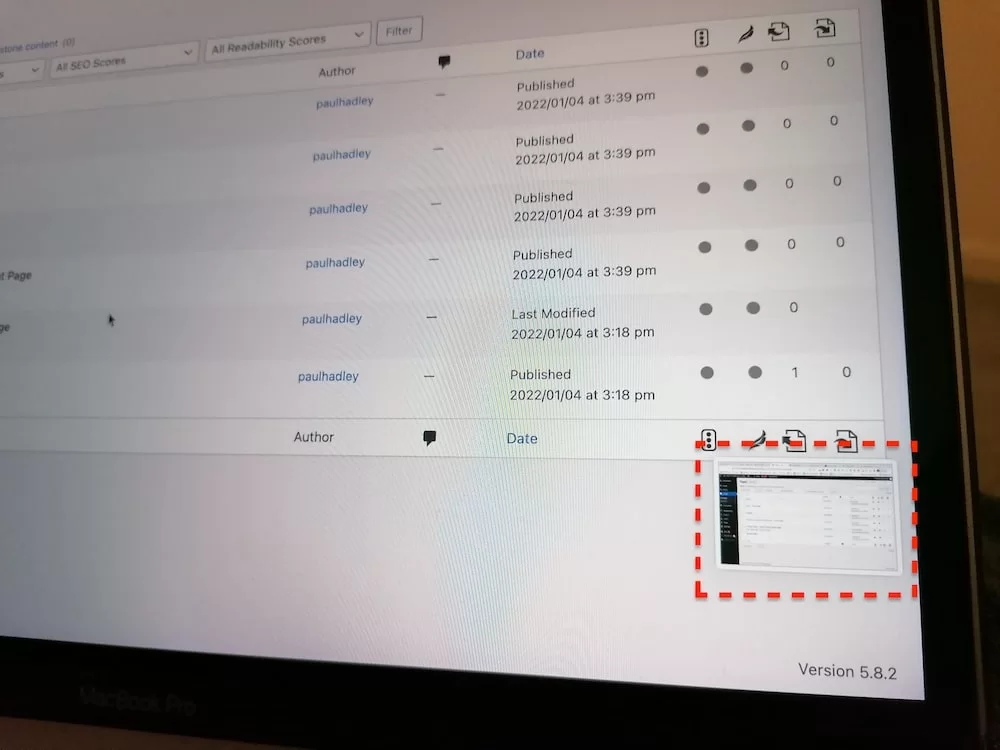
However, and while that floating thumbnail is still there and hasn’t yet gone away, you can click on it to access more options:
- (Left) clicking on that thumbnail will bring up your photos app (preview), enabling you to edit the screenshot.
- Right-clicking will open a more extensive options list, where you can set:
- Where to save the screenshot to
- Which app may be used to open said screenshot
- Show this saved screenshot image file in Finder
- Delete the screenshot from your computer
- Open the screenshot in the Markup tool for annotations
- Close the floating thumbnail window
- Swipe on the thumbnail to dismiss the floating window (later on, we’ll discuss ways of how you could permanently disable it from appearing)
Fullscreen Screenshot On Mac – Copy It To The Clipboard
Just be sure to wait a moment while the screenshot is saved. Dismissing that thumbnail too quickly may result in the taken fullscreen screenshot not saving at all. It may take longer depending on how fast your particular Mac is. Not to mention how many monitors it may need to capture at once.
But what if you don’t want to save it as a file on your hard drive? Should all you want is a quick grab of your screen to share it with someone, you could press the Control (CTRL) key to copy the file onto your clipboard, at the same time. Note, this won’t save the screenshot onto your Mac’s hard drive.
To do this, press and hold down COMMAND, SHIFT, and CTRL, and then press 3 on the number row. The same fullscreen screenshot from earlier will now be saved into the clipboard. Just pop open any app or site that you want to paste the image to, and press [Command + V] to insert it.
Command + Shift + 4 – How To Take A Partial Screenshot On Mac
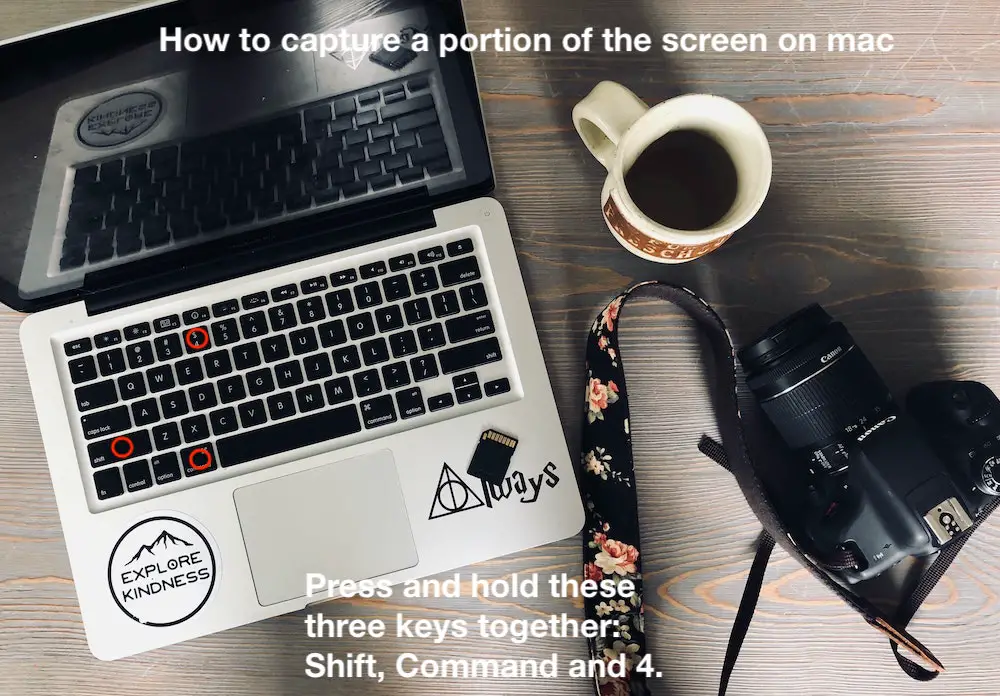
Be it for privacy reasons, or for when you need to screencap a specific part of your desktop, you could use [Command + Shift + 4] to highlight and grab only a portion of your display. You can then choose the sections of your desktop that you’d like to capture, by drawing a box over it.
Once you press the aforementioned keyboard shortcut, your mouse cursor will turn into a crosshair. You can then click and drag on the parts of the screen that you’d want to screengrab, thus creating a rectangular window to highlight what the final screenshot image will eventually show.

Once again, to do this, press and hold COMMAND and SHIFT, before pressing and holding 4 on the number row at the same time. After that, use your mouse or touchpad to draw a box atop what you’d like to save as a screenshot. Just like a fullscreen snip, a PNG file will be saved to your desktop.
Just remember, that once you’ve drawn this window over your desktop, letting go of the mousepad or left click button will save it. Or, and if you’d like to cancel or reset (without saving the file), just press the Escape (ESC) key. You also have other options while you’re holding those three keys down:
Capture A Select Window – Command + Shift + 4 + Spacebar (Press And Release)
When you press and hold COMMAND and SHIFT, press and hold 4, and then press and immediately release SPACEBAR (not holding it down), you’ll notice that your mouse cursor turns from a crosshair, into a little camera icon. This lets you know that you can take a screenshot of a select window.
For example, let’s say that you have several app windows open on your desktop. Using this shortcut will enable you to highlight any one of these app windows. The built-in screenshotting app will then determine the edges of that window, and would intelligently capture what’s inside of it.
Once you’ve activated that keyboard shortcut, hover your cursor over any app window. It would draw a white border around that window. This helps to define the boundaries of what it saves as an image. If you’re satisfied, click on the screenshot app’s window selection to have it saved to your desktop.
Repositioning The Box – Command + Shift + 4 (Draw Box, Then Press And Hold Spacebar)
Now, let’s press and hold COMMAND and SHIFT, press and hold 4, draw box and then press down and hold the SPACEBAR. This will be handy when you’ve already dragged across the desktop and have highlighted the portion that you’d like to save as a screenshot. But… Your original selection may be slightly off.
With your hands still firmly in place on the mouse or touchpad (remember: letting go of your control over the cursor will save the screenshot), press and hold the Spacebar. What this does is lock in the shape and size of your current selection area, while also letting you freely reposition it on the screen.
Once again, it’s great to have if your drawn area isn’t placed correctly, and would rather not have to reset or cancel it (by pressing Escape). With the Spacebar held in place, move around the selected box over your desired part of the screen, and release the mouse or touchpad to save it as a screenshot.
Resize The Height And Width – Command + Shift + 4 (Draw Box Then Press And Hold Shift)
If moving around a pre-sized box still isn’t precise enough for you, you could otherwise alter the height and width of your selection on the fly. Let’s start from the basics… Press COMMAND and SHIFT together, hold it and press the 4 key on the number row to take a partial screenshot.
As you’re moving the crosshair around to highlight a part of your desktop that you’d want to capture, go back to the keyboard. Now, press and hold SHIFT, which first locks one of the axis of the box depending on the direction your curser is travelling. This allows greater ease and accuracy that you may sometimes need.
In this mode, you can move your mouse cursor up or down to adjust the height of the selected area. If you want to resize the width instead, let go of the SHIFT key. Now, press and hold SHIFT again (while you’re still keeping a hand on the mouse button or touchpad) to switch to adjust the width.
Once more, this locks in the top and bottom edges of the selection box, preventing you from re-sizing those. You’re now free to move your cursor left and right to alter the width. You could reposition back to adjusting the height by letting go of the SHIFT key, before then pressing and holding it again.
When you’re happy with the size of the highlighted selection window, you can let go of both the SHIFT key and mouse button or touchpad. This will save your screenshot onto the desktop. This is a fantastic inclusion for those of you who might be a bit picky with perfecting your screenshots.
Command + Shift + 5 – How To Take A Screen Recording On Mac
Last but not least, you have the option of screen recording on your Mac by pressing [Command + Shift + 5]. There’s more to that, mind you, as activating that shortcut loads up your Mac’s native screenshot app. You can see a floating overlay appear near the bottom of the desktop, near the Dock.
If you’d prefer not to memorize three distinct keyboard shortcuts for how to screenshot on Mac, then remembering [Command + Shift + 5] should be sufficient. The screenshot overlay has options for either a fullscreen, app window selection or freeform screenshots right on the menu.
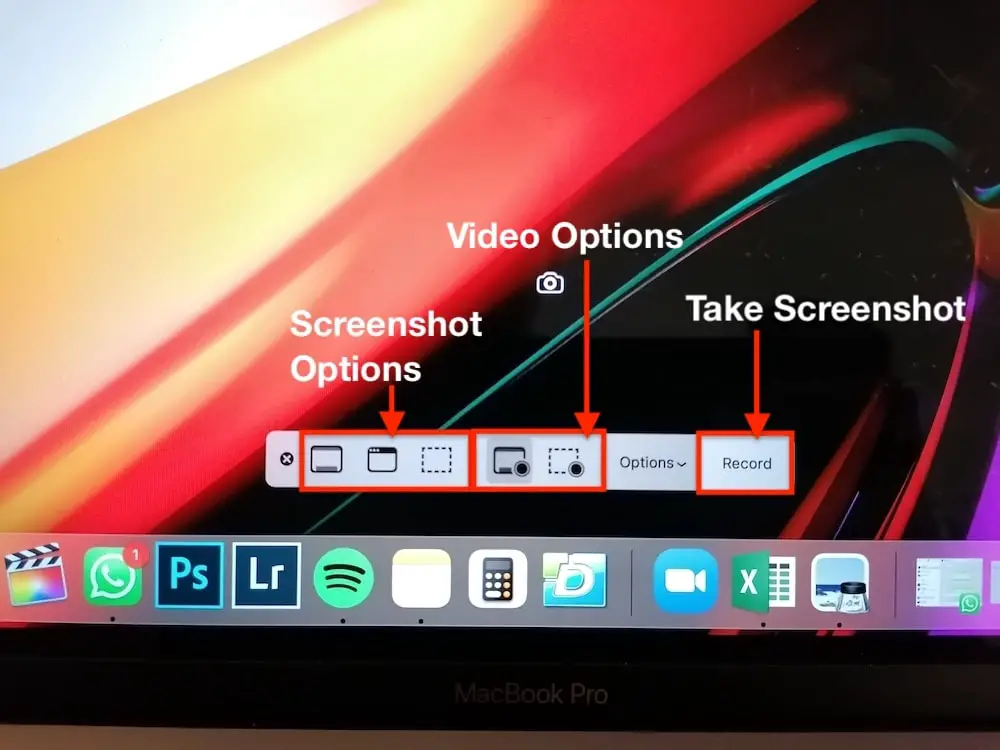
They appear as the three left-most icons, which you can use by clicking on them. After that, we have another two nearly identical icons, with a circle drawn on them. These are where you can access the screen video recording functionality, either in fullscreen or partial screen modes.
Once you’ve pressed any one of the screen recording options, you can press on Record to begin. Once you’re done, press on Stop on your Mac’s Menu Bar to halt the recording, and have it saved onto your desktop as an MOV file. Move further right, you have a couple more options…
Screenshot App Menu – Other Save Locations
Moving away from the screenshot and video recording icons, you have an Options menu that, when pressed, will show a drown-down list. Here, you can play around with three screenshot settings that may prove fairly handy.
The first is the Save To option, which defines where Mac’s native screenshot app would save the PNG (screenshot) or MOV (video recording) file. By default, it’s set to save directly and appear on your desktop. In addition, you could instead save it to:
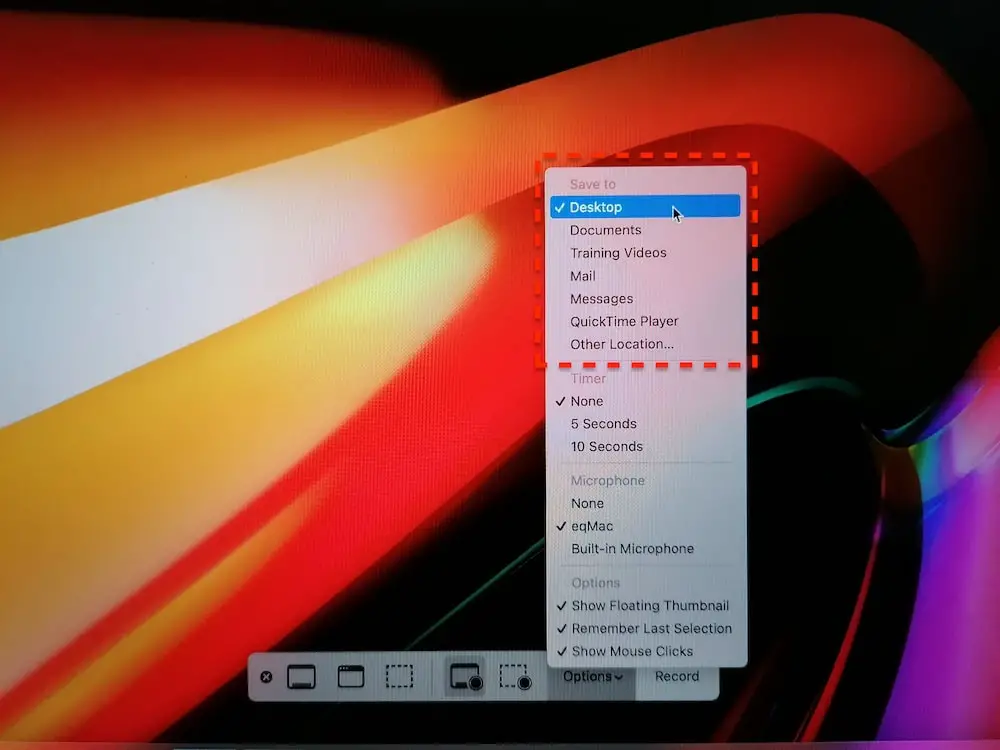
- Documents
- Clipboard (similar to how we explained it earlier, this will save your screenshot to the clipboard, rather than saving it to your hard drive as a file)
- Messages
- Preview
- Other Location (you can manually set the directory or folders that you’d want the saved file to appear in)
Screenshot App Menu – Extra Capture Options
Moving along, we have a Timer option. If you look at the far right-hand side of the screenshot menu, you’ll notice a large ‘Capture’ icon. Pressing this will prompt a screenshot. If you want a bit more time to readjust your desktop or the selection box, you could set a timer before the screenshot is triggered.
There are only three options – None, a 5-second delay, or a 10-second delay. A countdown will appear if you have a timer set. Regardless, the Capture icon is a redundant measure for taking and saving a screenshot. Ordinarily, you can simply press the RETURN key on your keyboard to take it.
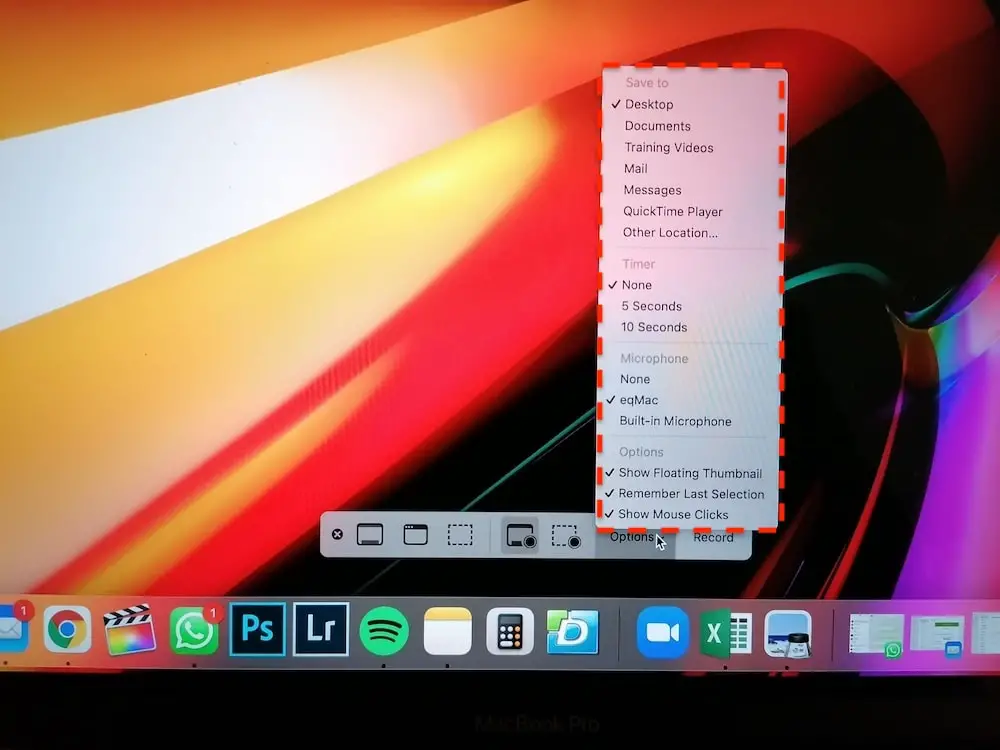
Then, we have three more options:
- Show Floating Thumbnail – As we highlighted earlier, this is how you turn off that floating thumbnail preview window. Remember, it appears on the bottom right corner of your desktop anytime you take a screenshot. This is turned on by default, but you can easily keep it turned off here.
- Remember Last Location – This is a brilliant hack if you capture a lot of screenshots. This option allows you to pre-set a selected portion of the desktop to screencap. When you’ve done that, simply click on ‘Remember Last Location’, and your Mac will remember its exact location and size to screenshot next time. If you want to take that shot again, use [Command + Shift + 5], and press RETURN to capture it.
- Show Mouse Pointer – This depends on whether or not you’d want the cursor to appear in screenshots or recordings. If turned off, the screenshotting app will remove any traces of the cursor in the final image or video.
Command + Shift + 6 – How To Screenshot Your Mac’s Touch Bar
For those of you who have a Touch Bar-equipped Mac, you could of course take a screenshot of that, too. With its tiny display, you’d naturally not have that much to capture anyway. So, your only option is a full screencap of the entire Touch Bar, which you can access with [Command + Shift + 6]., you could of course take a screenshot of that, too. With its tiny display, you’d naturally not have that much to capture anyway. So, your only option is a full screencap of the entire Touch Bar, which you can access with [Command + Shift + 6].Command + Shift + 6].].
While we’re here, it’s also worth mentioning how that screenshot overlay menu from earlier will open up in the Touch Bar if you have one on your Mac. You don’t get access to the Options drop-down list if you do this. Still, most of the functions are there within quick and easy reach.
How To Change The Screenshot File Type On Mac?
As standard, all screenshots (images, that is) are saved onto your Mac as PNG files. This particular file format tends to be larger in size. If you’re constrained on storage space, you could save those precious megabytes by opting to change the default file type to JPG, instead.
To get your Mac to save screenshots in this leaner and more compact file format, you’ll have to:
- Open up your Mac’s Terminal app.
- Then, type in this command (without the quotation marks), “defaults write com.apple.screencapture type jpg“
- Finally, press on the RETURN (Enter) key.
- The next time you take a screenshot, the file type saved onto your desktop should now default to JPG instead of PNG.
Third-Party Apps For How To Screenshot On Mac
While Apple’s own built-in screenshotting tools are more than enough for most basic needs, there are instances where having additional capabilities isn’t a bad thing. Hence, why there’s a vast selection of third-party apps that can offer you the added granularity in how to screenshot on Mac.
They enable more options, such as being able to quickly share your desktop with others. Or, perhaps being able to record individual clicks and keystrokes, or upload them to the cloud. Crucially for the students and workers among you, extra annotation and mark-up options are always welcomed.
Here are some of the best third-party screenshotting tools that you can download for your Mac. Just bear in mind that while many are generally free of charge. Some may require a one-time payment, or monthly/yearly subscription to access their functionality:
